
Photography Workflow

This is a continuation of the last post On The Usefulness of Photography.
Here I will give some background on my photography editing workflow, and a few recommendations if you’re new to photo editing. I’m not sure what’s useful to tell, so it may be quite meandering. Also: I cannot tell you how to be a great photographer, I’m no professional, I can only tell you how to take pictures and think about the editing process like I do.
My first camera I bought at 18, a Canon S3 IS in 2007. Since then I have often carried a camera, and around 2014 (when I switched to Fujifilm cameras) I started bringing one with me wherever I went.
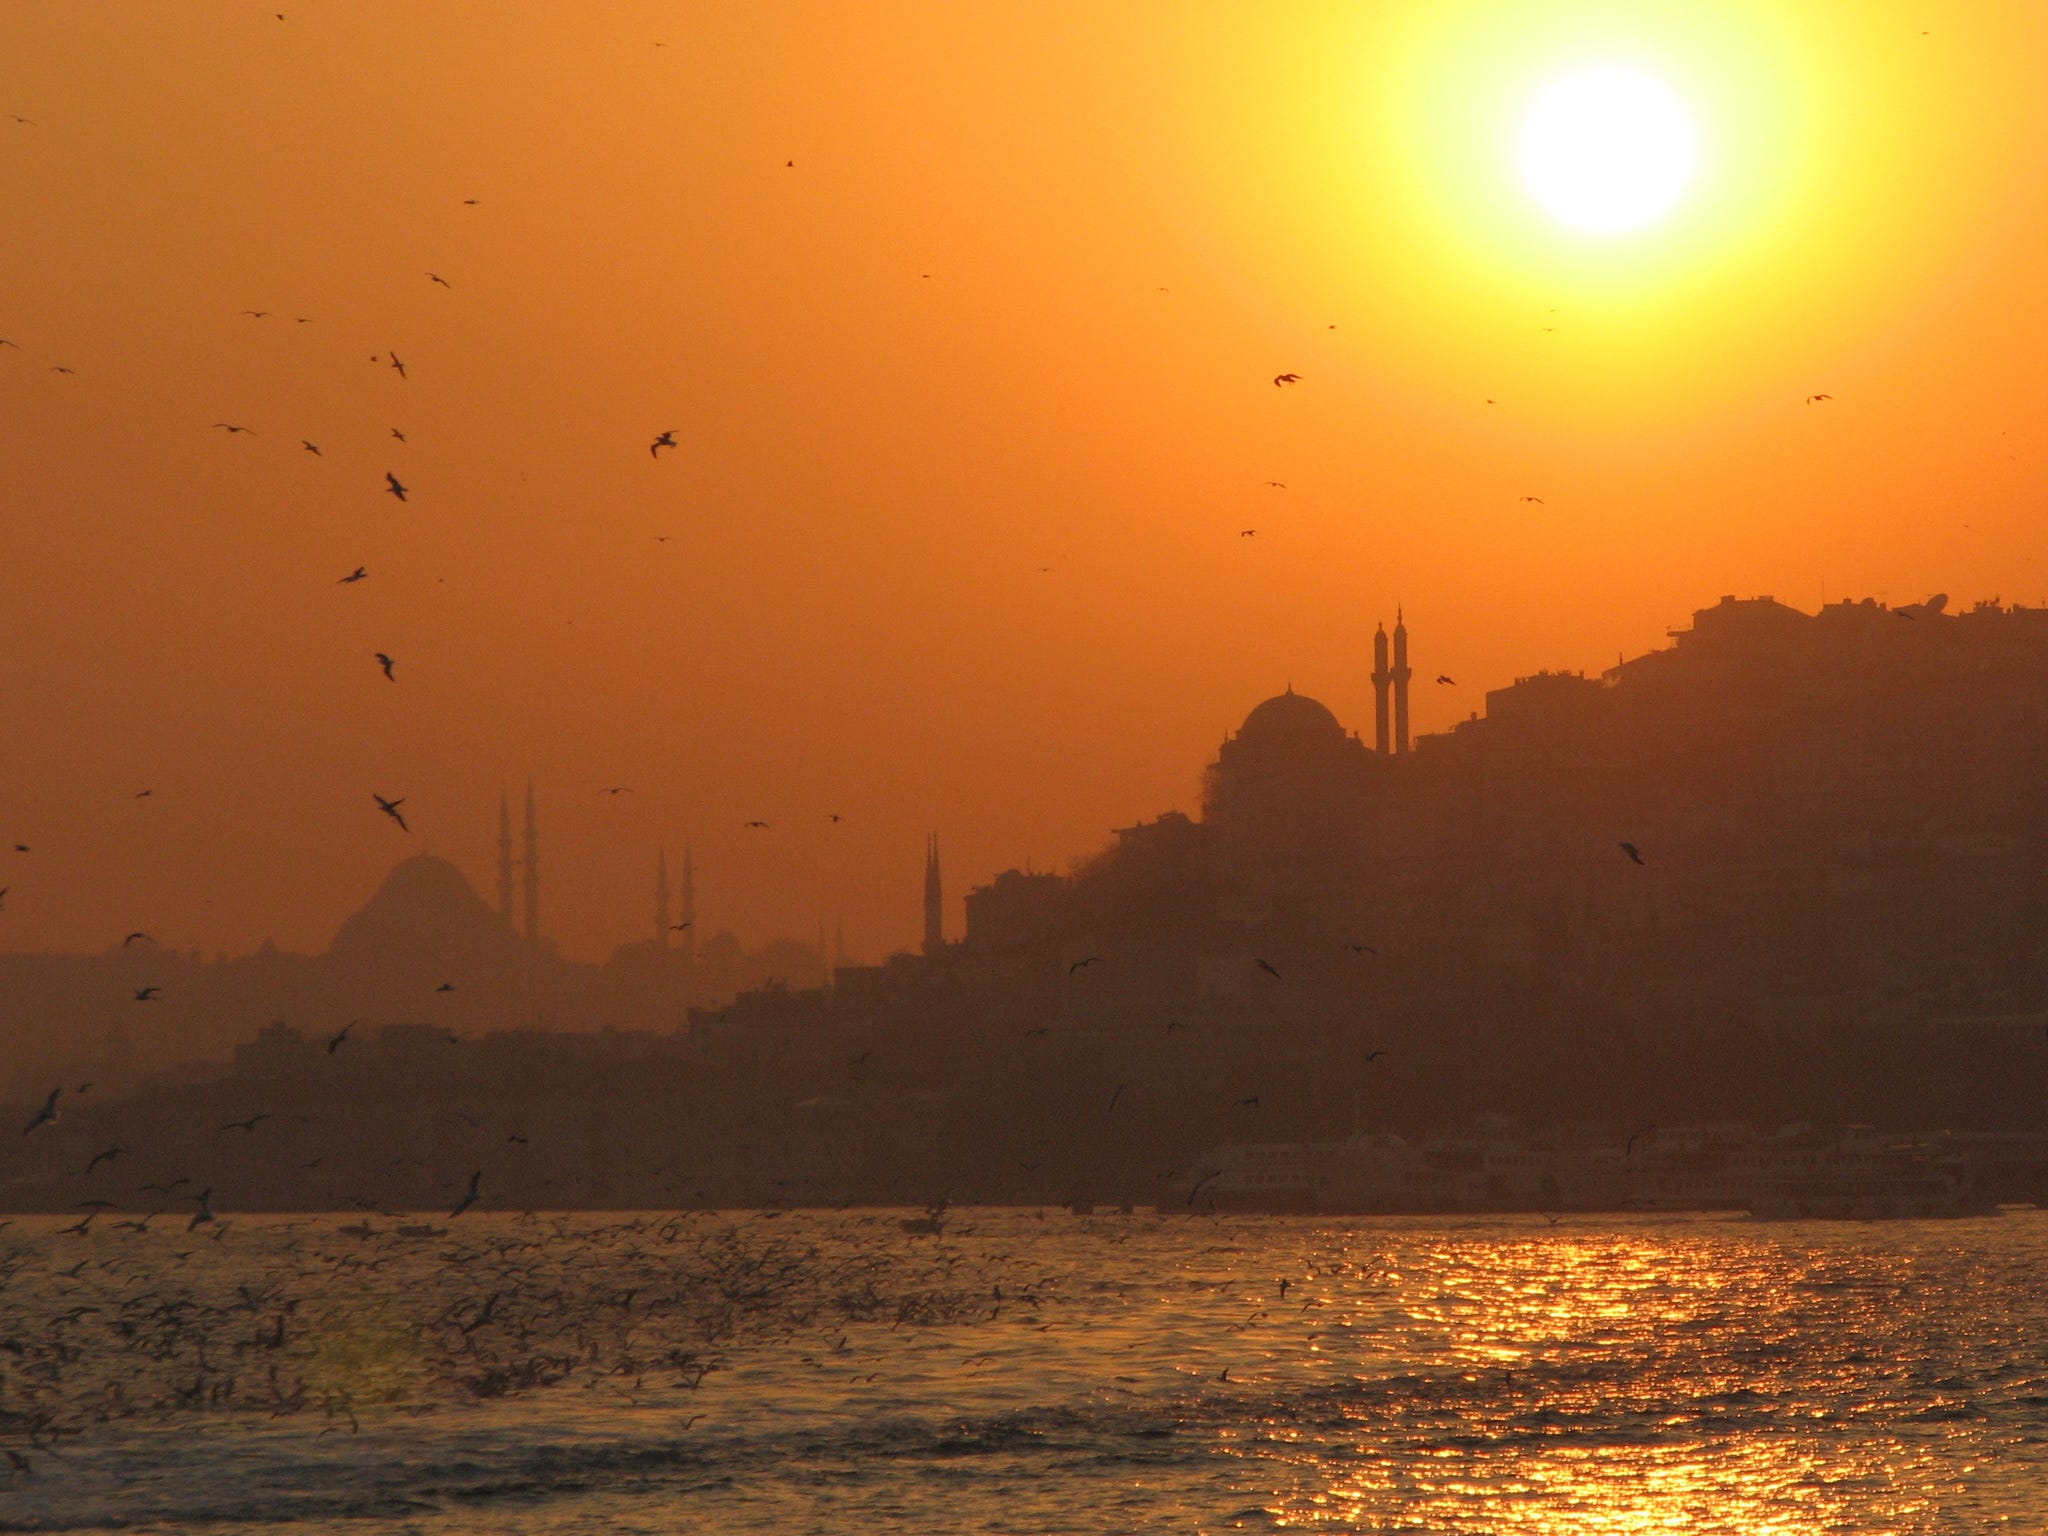

Istanbul in 2007, with the 6 megapixel Canon S3, some of the first digital photos I ever took straight out of camera.
Some years I take 10,000 photos with my (real) camera, other years 2,000. I always take a lot on my phone. Today many of my photos, especially quick snaps of food or the house, are just my Pixel 2 camera. If there’s enough light and you’re not doing portraits, modern phone cameras are work well. I also use a Leica Q2, which has a fixed 28mm lens, for model and travel photos. If you’re thinking about buying a camera, I’ll give some recommendations at the end.
I use VSCO to edit on my phone, often even my 47-megapixel Leica files, and I recommend it to anyone. It has a small learning curve, but its easier to learn than pro software like Adobe Lightroom. I use Lightroom too, but only for intentional model shoots (by that I mean, when I go out shooting with a person and a plan). VSCO has a free version with 90% of the features, or all features for a small yearly cost (that’s far cheaper than Lightroom).
The big advantage of editing on your phone is simple: If you want to post photos, you should remove all barriers to posting photos! To that end anything you do that shortens the line from taking the photo to posting it is good. You could not edit photos at all (aka post straight-out-of-camera photos), but I think this is usually a mistake, like leaving a painting half finished. Photo processing has always been a part of photography, since the days of photo etchings and film.
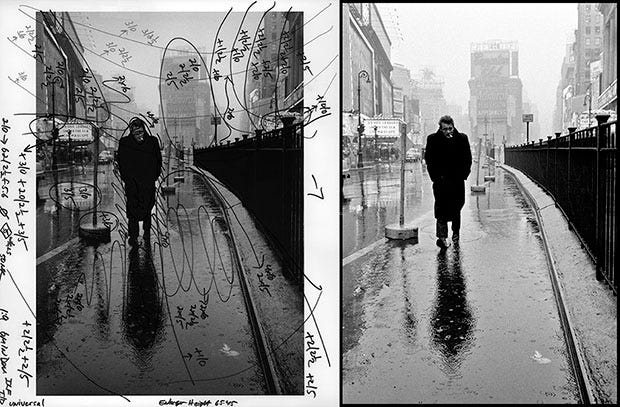
James Dean in 1955 by Dennis Stock, marked up for editing in the darkroom by Pablo Inirio, showing Pablo’s careful post-processing to dramatically draw out Dean.
Of course, its’s easy to get carried away. Perhaps the biggest problem new photographers have is that they take too few photos, but the second might be that they spend too much time editing. (Or worse, they never “get around to editing”, and their photos sit unseen even by them once transferred to their computer!) If you’re new to photography, you should resist the urge to edit too obsessively for a while, and instead focus on finding interesting subject matter, developing your eye for composition, and (if you want to) getting into a workflow for sharing your work.
Aside: If you’re new to photography and wondering whether to shoot in RAW or JPEG, I recommend JPEG for the same reason. RAW will slow you down. It helps however if you have a camera that produces good JPEGs, like Fujis, and you’re really interested in the more professional side of photography you’ll eventually want to shoot RAW, but I think most people read advice online (which can be summarized “real photographers shoot RAW”).
So: Take pictures ➡ transfer to phone (most cameras have an app for this) ➡ edit with VSCO ➡ post. Skip a step if its a phone picture. This is how much of my photography is done.
Minor note about VSCO: It’s also a pseudo social media/photo sharing app. I don’t use that part of it. I only use it to edit, save the result to my phone, and then use Twitter and Instagram to post.
Editing
When people start with photo editing they make common mistakes: Too much saturation, too much contrast, too much sharpness. People want to change their photos and the easiest way to see a change is to give it a lot of punch. Generally it is safer to do the opposite and tone all of these things down slightly. Some photos look really good when made more dramatic via contrast (like James Dean above), but fewer than you’d think.
Presets
VSCO (and a lot of photo editing apps) center around a number of sliders that you can adjust up or down (like exposure, contrast) or only up (like grain, sharpness, tone). Presets are opinionated starting points for all of these, and you should use them, but after you flip through several, if you click the button again, it presents a slider where you can tune just how much of the preset to apply, on a scale from 0-12. For many of them, going over 6 is overdoing it. Still, you should play with them a lot and see what you like and don’t.
After presets, I suggest you start by doing two things: Move sliders (contrast, exposure, etc) up and down. A lot. Make a bunch of pictures brighter. Make them more grainy. Save them to disk and try again by flipping things around. Come back to them later and think about them again.
Then, go collect images from photographers you really admire, and compare with your own. What’s different about their photos and yours? Try to make your edits look like their edits, if possible. You might find out what’s missing from your edits, or it might make you realize something is missing altogether from your composition.
This kind of comparing-with and attempting-to-copy the artists you admire is one of the best ways to learn. If you feel like your work is “off” then it’s the first thing you should do. It’s somewhat shunned these days, where people think of comparing yourself to others and intentionally copying as plagiarism or un-originality, but such an attitude is a huge mistake. Almost all great painters learned by copying, sometimes directly copying, the works of the masters that came before them, and this way of working is useful for getting yourself onto the right track. After a while, once your own work improves, you will become somewhat naturally dissatisfied and move into making your own edits, and develop a personal style. But it’s hard to simply become good from scratch, so you should start with an aim towards making your work like the work of those you admire. I hope that makes sense.
~ ~ ~
Color grading matters. Either by careful composition or a lot of editing (or film processing), most good photos (and movies, and games) maintain a very reduced color palette. You can see this very clearly on the subreddit AccidentalWesAnderson, which I (accidentally) created years ago even though I don’t use reddit. Many people call Wes Anderson’s aesthetic colorful, and in a way it is, but in any given shot the color palettes are often extremely limited. This can be hard to notice if you haven’t thought about it before, but try watching a film (any film) and thinking about the colors you see in a specific scene.
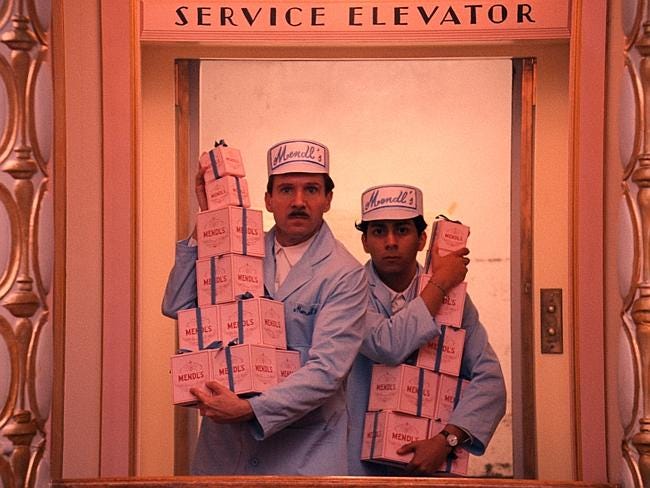
Typical Wes Anderson color grading: In this Grand Budapest Hotel scene, everything is pink. Even the yellows and whites are pink. Even the blue coats are pink!
You should try to strive for a limited color range, at least at first, and you’ll notice a lot of the VSCO presets do just that. I often prefer like a somewhat desaturated look, and even in my more colorful photos I’m usually trying to edit down the number and magnitude of colors. For me this does not mean turning saturation down very much, but instead de-saturating specific colors, like the reds in the first picture here, or the blue in the last picture. I also modified the hue of the blues in the 3rd picture.


These color changes are typically done with the HSL tool (hue saturation luminosity) in both VSCO and Adobe Lightroom. You pick a color band, for instance “blues”, and then can change the color itself, its particular saturation, or how light/dark it is. It is very common for me to desaturate one or more colors, or lighten skies considerably (so instead of “VERY BLUE” or “gray” (desaturated) they sky becomes “mostly white” (a little desaturated, luminosity turned up).
Here’s an example in VSCO of the original (left) vs after editing. Note the sky especially. The camera is capturing deep blues that I think distract from the subject of the photo. I want to give it a bleached and somewhat lazy feel of a sunny day, so I desaturate the sky, lower the contrast a little, bump up the shadows until you can just see the hedge detail better, and give it some grain.
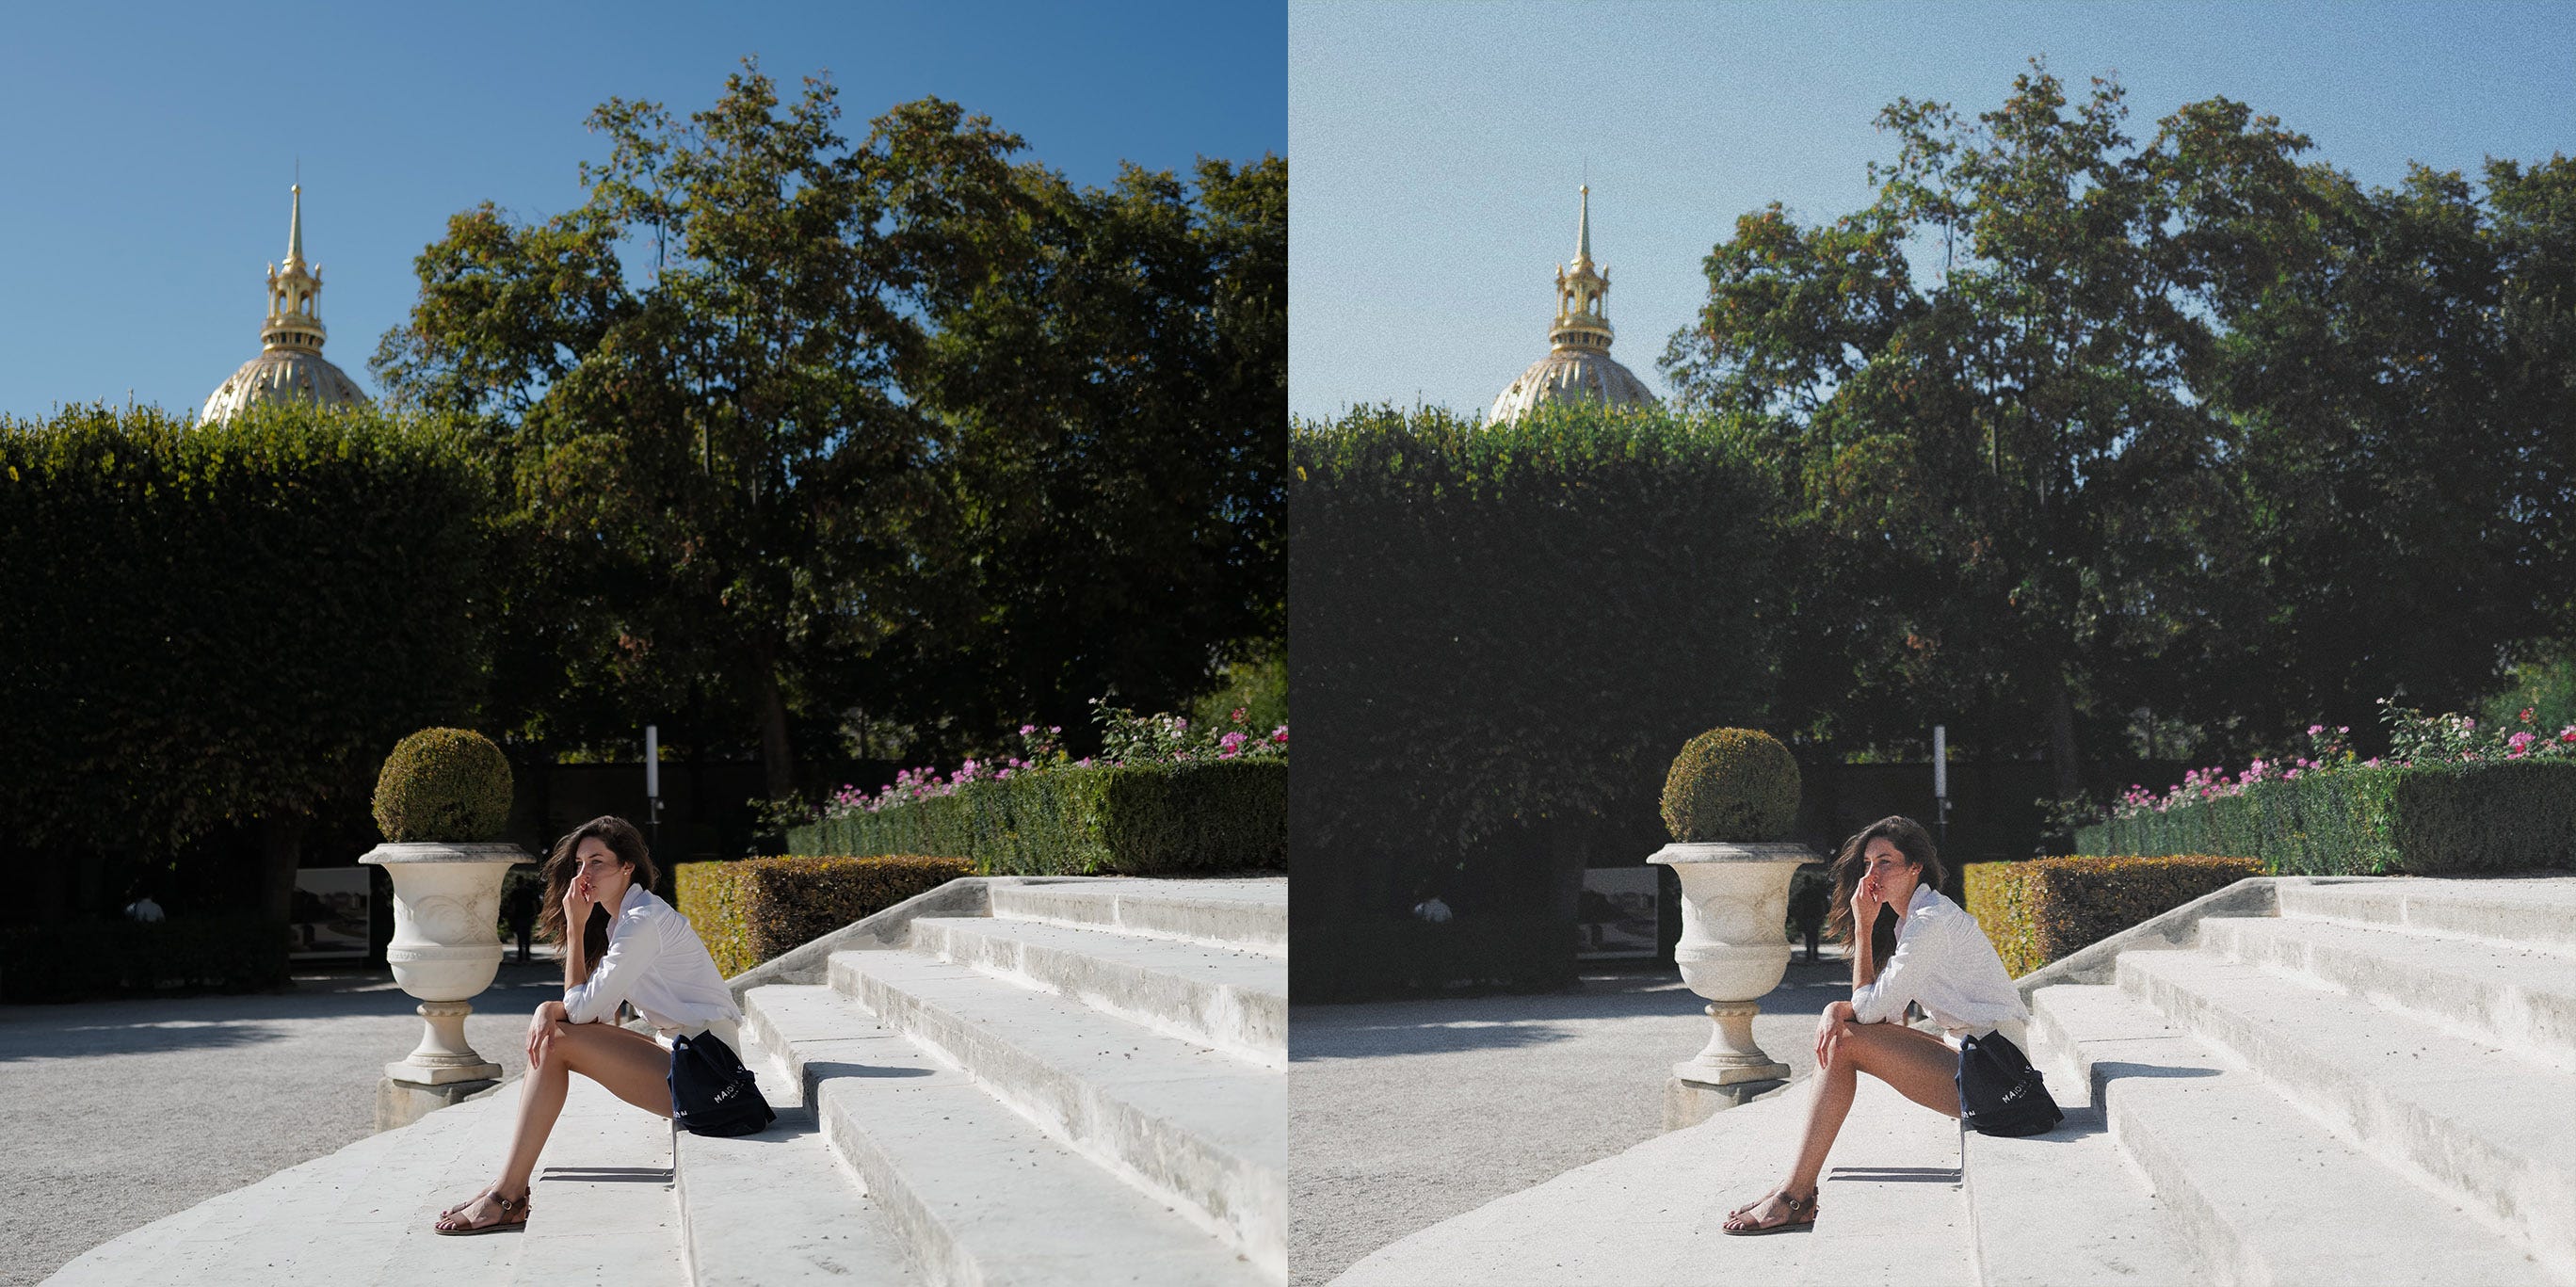
The actual edits for this photo in VSCO are:

On the right you can see how I modified the blues: slightly less saturated, a lot more luminous, and now the sky is less concentrated and more matched to the foreground.
I picked this photo because it was a very general example, the edits are obvious side-by-side without being too severe. I hope it gives a good impression of what I’m doing. If any of this is confusing or if you think more examples would help feel free to ask for more on Twitter and I’ll be happy to try and help, if I can.
Spot Editing
This is something that VSCO doesn’t do, and you’ll have to use something else like Lightroom (even Lightroom mobile) if you need to touch up certain areas. If you’re new to photography, unless you have things like orange Home Depot buckets in the background of your otherwise beautiful shot that you want to remove, I wouldn’t spend much time spot editing at first. (The next most common spot edit, after removing objects, is selectively increasing the exposure or shadows on parts of an image, e.g. a person’s face).
~ ~ ~
Some final thoughts. Along with taking too few photos, another mistake new photographers make is feeling like they have to share something from a photo shoot. Sometimes even when doing planned shoots with a lot of ideas, you’ll take 500 photos and get nothing that really feels like what you wanted. If you resist sharing work you’re not happy with, you do a favor to yourself and your audience.
If you don’t have a camera, I recommend looking at Fujifilm. Unfortunately their lineup is a bit confusing these days—there are a lot of options, and they are not sensibly named—but they are easy to use and produce great JPEGs that are nice to work with. Their built in film-simulations are a lot of fun too. I think for the money they are the best cameras on the market. Their pro cameras replicate film camera controls (and looks), which I think is underrated.
Fujifilm makes mirrorless cameras, which unlike DSLRs only have an electronic viewfinder. There is no mirror, so you don’t literally see out of the lens, instead you see a small electric screen that shows you what the picture will look like. This makes them much more compact than DSLRs. The quality, these days, is just as good. Since 2014 I’ve used a mirrorless because this compactness allows me to take it everywhere, though some are smaller than others. Some Fujis to consider, all of which use the same sensor:
X-T4 and X-Pro3 — semi-pro cameras wit somewhat big price tags and interchangeable lenses. The main difference is where the viewfinder is located (center or on the edge of the camera).
X-T30 — A less-pro version of the X-T4. Fewer controls and no waterproofing, but it has the same sensor and uses the same lenses and is a few hundred dollars cheaper
X100 series, such as X100F and X100V, (not to be confused with the (X-T100!) — These cameras have a fixed 23mm lens attached, meaning you cannot swap it out, and you cannot zoom. This poses a huge limitation on the user that wants to do everything. But if like me you want to mostly shoot documentary-style photography, street photography, landscapes, and occasional portraits, it works very well, and is highly compact. If you buy a fixed-lens camera (or an interchangeable and use a prime lens), you will learn more, faster, about photography. Fixed focal lengths force you to think more about composition, and they force you to move more too, since you mostly have to zoom with your feet. This means some photos will be impossible to get, don’t buy the X100 series if you want to take wildlife shots. But aside from that, the modern sensors offer a lot of cropping potential, and you can shoot the 23mm almost as if it were a 50mm.
The X100F which I used for years has two main drawbacks: It’s not water-sealed, and when shooting wide-open (a large aperture) it has some softness, it only becomes really sharp around f4. These are not deal breakers and since it’s cheaper than the newer X100V I recommend it. Allegedly, the X100V fixed both of these issues, but I’ve never tried the camera.
There are other cheaper Fujis, but I don’t know enough about them to say much. One nice thing with the interchangeable X-system lenses is that if you buy a cheap model and want to upgrade later, all your lenses will work with the nicer models.
I’m sure there was more I was going to say, but for now its lost in another part of the forest. This email I worry is too long, and in the future if I talk photography I will try to keep it shorter. Perhaps I’ll take a few photos I like of other photographers and explain what I like about them, or cover my thinking behind a single photo.
This New Hampshire night is hot, but it’s raining pleasantly now. Good night.
s s
with a Fuji X-T2, 2017.
Thank you for this essay. I learned about taking away colour, rather than saturating everything. Counterintuitive and wonderful. Thank you!
Really enjoyed reading through this, Simon, thanks! I wonder if anything substantive has changed since 2020?